
 I’ve been incubating my own eggs for about 10 years now. My advice to anyone starting out is to get the most foolproof incubator you can afford. I tend to be a minimalist at heart when it comes to projects. If there’s a simple tool that can do double duty, or if a task takes me a little longer in order to save money or to avoid having to buy another gadget, I usually do. But with incubating eggs, if you can get an auto egg turner, or a digitized temperature control, or anything else that will help you, I recommend it.
I’ve used a variety of incubators over the years, all ranging in price and function. My opinion when it comes to incubators is that you get what you pay for.
Of all the chicken questions I get over at my blog, incubator troubleshooting has to be the highest. People are heartbroken when they wait the 21 days with anxious excitement. They see that first pip and then…nothing. The chick seems to wither in the shell and die trying to escape. I get a ton of people ask if they should assist a hatch that isn’t progressing. And to be honest…assistance often results in a dead chick anyway.
It’s sad all around and very disappointing.
Humidity in Hatching
The trickiest part of incubating is finding the right humidity levels. It’s fairly simple to rotate eggs with success and to keep the temperature at relatively the same level, but humidity is more complicated.
Chicks have different humidity needs throughout different parts of the hatch. Everything I’ve ever read about incubating chicks says that through days 1-18 the humidity level should be around 50 to 55% then increase to around 65% for the last three days of lockdown.
 Lockdown takes place in the last three days of incubation where the incubator should not be opened to prevent humidity from escaping. Too little humidity during hatch can result in the chicks being shrink-wrapped by the shell membrane as they try to break through the eggshell. The membrane gets rubbery and the chicks can’t escape.
I’ve had problems with this over the years, so as a precaution, I’ve been diligent about adding water to my incubator, even errored on the side of too much humidity. My thinking was…”Let’s keep that membrane nice and pliable so the chicks can get out easily.”
But after a few hatches, I then started to notice a different problem. The chicks would pip (make the initial breakthrough the eggshell) and then that was it…they would never progress.
Confounded!
After losing 2 unhatched chicks earlier in the spring, I decided to do some more research on incubator humidity.
I kept coming across this term “dry hatch”…at first I ignored it because I honestly thought that that hatching dry would just compound my problem. The chicks needed moisture, right? To get through that tough membrane?
But then I came across a forum question that described exactly what I was experiencing in my incubator. Several readers suggested doing a dry hatch to solve the problem.
What is a dry hatch?
 A dry hatch is exactly what it sounds like. You do not add water to your incubator for the first 18 days. Then on lockdown, you up the humidity to 65-70%.
It seemed counter-intuitive, but I felt like it was worth a shot.
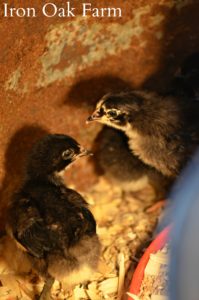
This past week I dry-hatched out an incubator of French Black Copper Marans and Olive Eggers and every egg that was fertile hatched successfully!
Why it works
 I didn’t realize that an egg NEEDS to lose humidity so that the growing chick can have space to move around in the egg in order to hatch. This is how it creates the zipper (an opening around the equator of the eggshell in a healthy hatch).
The chick also needs that extra air space so it can breathe during the last day or so of the hatch. At this point, the chick is fully formed and needs air to have a healthy respiratory function.
In essence, by adding too much humidity I was drowning the chicks in the shell.
 Right now I have three incubators filled with Buff Orpington eggs. I am attempting again to dry hatch them. If this works as well as the other hatches, this might become my new method for incubating eggs. I will let the community know how it goes.


19 Comments
Don’t leave us hangin, how’d the Orpington’s do?
PS. Very interesting about the zipper. I’ve never known that. I have noticed that sometimes the lining between the shell and the unborn chick is stronger and thicker than others and have wondered whether the chicks have trouble getting through the lining.
I don’t use and incubator but let my hens do the incubating when they want to set. I put newly laid fertile eggs from our roosters under them and wait for 21 days. But the hatching can be uneven. I know that humidity is very important and wonder whether the same ideas should be considered as I watch my setting hens. I don’t typically go near a setting hen who has fertile eggs under her but the conditions are always variable. Your information will help me manage some of the conditions better. Thanks
Just wondering if anyone can help. I have the brinsea ovation 28 advance. I am looking at dry hatching to try and get better hatch results and i have heard alot of people have great success with dry hatching. i was wondering on the settings on my incubator what do i set the humidity to it also has a built in pump which draws the water into the incubator do i just leave this and put a pot of water at the side? Any advice would be greatly appriciated.
Does this work for ducks as well?
I’d love to know this also as I’ve read ducks can take longer to incubate
I am also going through this problem. My chickens egg just make a small opening and that’s it ! After that they didn’t even try that hard to escape the egg.
Hi
If you are dry hatching what do you set the humidity at for day 1 to 18? Thanks
You just leave it on ambient humidity if it’s too low (10-20%) add a little water but not too much and if it’s too high just leave them on their own. But don’t forget to increase humidity on day 18 till hatch.
What about desert environments. Out the is about 10%
I’m trying my first dry hatch with french black Copper marans. Hoping for a better hatch rate with this method.
Did it work?
Hi Jennifer,
I was wondering if you could tell me how the dry hatch(s) went? You stated at the end of your article on “Dry Hatching” that you would keep the community updated. Is there a place I can find that info?
Thanks so much!
My main question is with the eggs being cool to the touch after 3 days are they still viable ?
I bought an incubator, bought chicken eggs and had trouble holding temp and humidity. After 10 days I candled them and they all appeared to have died. So I tossed them out, I bought more eggs thinking maybe I done something wrong, after 2 days on incubation I decided to make an incubator out of a card board box, it seems to be holding a steady temp of 99 degrees and the humidity is 60 percent. I put a bowl of water under a 40 watt light bulb. So I transferred the eggs out of the incubator into the home made one, I noticed while transferring them they felt cool to the touch. The temp in my home made incubator dropped to 94 but seems to be coming back up. Humidity staid the same, I hope I done the right thing in doing this. I did put X’s and O’s on them and waiting to turn the eggs after 3 hours of them being in there.. Hope I didn’t mess up
I have an old Leahy Favorite incubator 1200. It’s a beautiful old cabinet incubator made from red wood that holds 1200 chicken eggs. I’ve been using it for about 15 years now. When we first got it I had no idea how to use it, it didn’t come with a manual…so, I merely put water in a spray bottle and left it in the incubator. Every time I turned the eggs I would spray them too, then on lockdown I would fill the bottom pan with water. We had great hatches up to 95% hatch rate because well, I wasn’t candling them either so the rest were not fertile. After I moved and about 4 years ago, I downloaded a copy of the manual and started following their directions to a T. Problem, like you, I was drowning my chicks in moisture. So I’ve gone back to the spray bottle method with this last hatch and I must say….I’m IMPRESSED!!! It’s another great hatch!!
I use a hose and a jug. And drip system with a over flow drip out. My water level never changes. And I don’t have fluctuations. In humidity or temp . . And the reservoir last for days on end
I just tie a not in the hose. So it drips slowly it’s a homemade incubator stryofoam box. With 60 watt bulb and a little fan and it works perfect . I tried. A bowl of water without the drip system. And I could keep consistant readings. Water level dropped . Heat goes up humidity goes down. As water evaporated. Shitty deal …. now my water level. Never changes and the same for my heat and humidity. I set my bulb deeper in the water to drive humid up .. and plug the vent a bit to keep/ rise the heat. It’s. The way to go. U will never b able to keep temp and humidity consistant with out it. Good luck to all
Have you had more success with the dry hatch?